

Amazing plant-based recipes requiring 10 ingredients or less, 1 bowl, or 30 minutes or less to prepare from our friends at the Minimalist Baker.
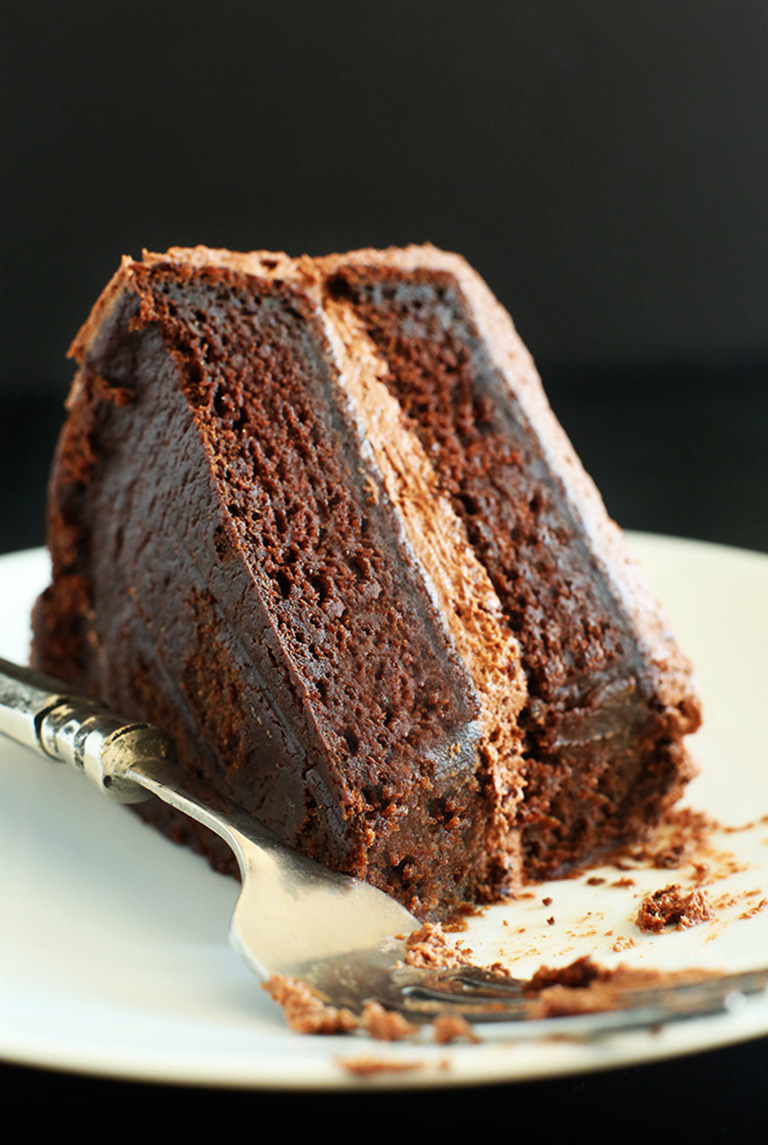
ONE BOWL CHOC CAKE
PREP 15 minutes; COOK TIME 30 minutes
CAKE
360 ml original unsweetened Almond Breeze Almond Milk
2 tsp white or apple cider vinegar
307 g unsweetened applesauce
120 ml strong brewed coffee (or sub more almond milk)
160 ml melted coconut oil (or sub avocado oil)
2 tsp pure vanilla extract
320 g whole-wheat pastry flour or unbleached all-purpose flour
266 g organic cane sugar (or sub granulated sugar)
96 g unsweetened cocoa powder
2 tsp baking soda
1 tsp baking powder
1/4 tsp salt
FROSTING
224 g vegan butter (softened)
280-336 g powdered sugar
63 g unsweetened cocoa powder
30 g dairy-free semisweet chocolate (melted and slightly cooled)
2 tsp pure vanilla extract
~60 ml unsweetened original Almond Breeze Almond Milk
Instructions
1. Preheat oven to 350 degrees F (176 C) and lightly spray 2 8-inch round cake pans or 1 large rectangular pan with nonstick spray (see notes for cooking times for different size pans // adjust number or size of pans if altering batch size). Dust with cocoa powder, shake out the excess and set aside.
2. Mix the almond milk and vinegar in a large mixing bowl, and let set for a few minutes to activate. Add the oil, coffee, vanilla extract, and applesauce and beat until foamy.
3. Add the flour, sugar, cocoa powder, baking soda, baking powder, and salt to a sifter and slowly sift over the wet ingredients while mixing with a hand-held or standing mixer. If you don’t have a sifter, simply mix dry ingredients in another bowl and add to the wet mixture while beating. Beat until no large lumps remain. It should be creamy and pourable. Taste and adjust sweetness as needed, adding more sugar if desired.
4. Divide batter evenly between your cake pans or rectangular pan.
5. Bake 25-30 minutes, or until a toothpick inserted into the center comes out clean. Let cool completely before frosting.
6. While cooling, prepare frosting by beating together all ingredients until light and fluffy, adding the powdered sugar in small amounts until you reach your desired consistency and sweetness. If it becomes too thick, add more almond milk. If it's too thin, add more cocoa powder or powdered sugar.
7. Once the cake is cooled, frost generously with buttercream frosting, adding a thick layer between the top and bottom layers (if doing a 2-layer cake). Alternatively, omit the frosting and dust with cocoa powder.
8. Serve with a scoop of dairy-free ice cream, a drizzle of chocolate, or caramel sauce, coconut whipped cream or a glass of almond milk!
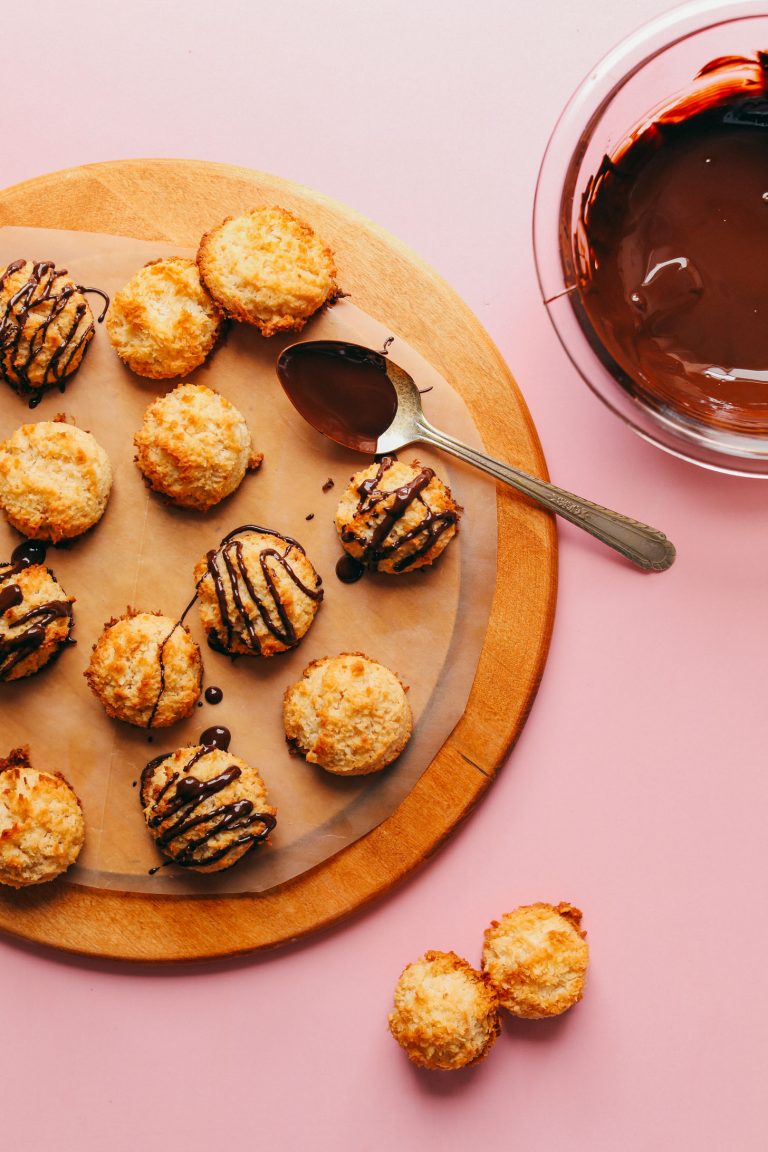
AQUAFABA MACAROONS
Vegan macaroons made with aquafaba! Just 6 ingredients required, naturally sweetened, fluffy on the inside, crisp on the outside! The perfect plant-based dessert.
PREP 15 minutes; COOK TIME 39 minutes
Ingredients
MACAROONS
320 g packed shredded unsweetened coconut
120 ml aquafaba (brine from canned chickpeas)
1/4 tsp cream of tartar (optional // to help the aquafaba stiffen)
105 ml maple syrup (DIVIDED // or sub stevia to taste - 1-2 packets)
1 tsp vanilla extract
1/4 tsp sea salt (plus more to taste)
30 g melted coconut oil (If avoiding oil, omit // coconut oil adds moisture and helps them brown in the oven)
CHOCOLATE COATING
80 g chopped vegan dark chocolate (I like Trader Joe’s 72% dark chocolate bar)
15 g coconut oil (if avoiding oil, omit)
Instructions
1. Preheat oven to 350 degrees F (176 C) and spread coconut on a baking sheet (or more baking sheets if making a larger batch). Toast for 2-4 minutes or until just slightly golden brown (be careful not to burn // see photo). Reduce oven temperature to 325 degrees F (162 C).
2. Transfer coconut to a food processor (or a mixing bowl) and add just under half of the maple syrup (3 Tbsp or 45 ml maple syrup as original recipe is written // adjust if altering batch size). Pulse a few times (or stir) to combine, being careful not to overmix. This will slightly moisten and sweeten the coconut. Set aside.
3. To a large mixing bowl, add aquafaba and cream of tartar (optional), and whip with a hand or stand mixer (you can whisk by hand, but it takes longer).
4. Once fluffy and semi-stiff peaks have formed (see photo), add remaining maple syrup (4 Tbsp or 60 ml maple syrup as original recipe is written // adjust if altering batch size), vanilla, and salt and whip again to combine. Lastly, pour in melted coconut oil and whip again to combine. At this point, taste your aquafaba and see if it needs any more sweetness. You can add either a little stevia or a bit more maple syrup. But don’t go overboard with the maple syrup or it may deflate your aquafaba.
5. Start with adding 3/4 of your coconut to the aquafaba and fold/stir to combine. If it looks too wet, add more coconut flakes a little at a time until you get a very moist “dough”. If the dough is too wet, they won't rise in the oven. If it's too dry, they will be crumbly. So be sure to add a little at a time until the proper texture is achieved. If you add all of the coconut and it still appears too wet, it's fine to add a little untoasted coconut!
6. Measure out heaping 1 Tbsp amounts and scoop onto a parchment-lined baking sheet. Bake at 325 degrees F (162 C) for 25 minutes. Then increase heat to 350 degrees F (176 C) and bake for 8-10 min more or until golden brown and semi-firm to the touch.
7. Let cool. Then enjoy. For a chocolate coating, melt vegan dark chocolate and coconut oil over a double boiler (or in the microwave in 30 second increments) until smooth and creamy. Then dip the macaroons into the chocolate and place on a parchment - or wax paper-lined baking sheet or serving platter. Drizzle the tops with remaining chocolate and set in the refrigerator (or freezer) to cool until the chocolate is firm to the touch.
8. Store leftover macaroons covered and at room temperature up to 3 days, in the refrigerator up to 5 days, or in the freezer up to 1 month. They are crispy the first day and then tend to soften, which is normal. They are still delicious though! Just best when fresh.

EASY BAKED CHEESECAKE
Amazing baked vegan cheesecake with a simple oat-almond crust that tastes like graham crackers! Easy to prepare, requiring just 1 blender! The closest thing to "real" cheesecake I've ever tasted.
PREP 6 hours 30 minutes; COOK TIME 1 hour 25 minutes
Ingredients
FILLING
120 g raw cashews
240 g coconut cream
227 g vegan cream cheese (Trader Joe's brand, or Toffuti)
7 g arrowroot or cornstarch
1 tsp pure vanilla extract
160 ml maple syrup (plus more to taste)
15 ml melted coconut oil (for extra creaminess)
2 tsp lemon zest
15-30 ml lemon juice (plus more to taste)
1/8 tsp sea salt
CRUST
67 g gluten-free rolled oats
84 g raw almonds
1/4 tsp sea salt
24 g coconut sugar (plus more to taste)
60 g coconut oil (melted)
Instructions
1. Add raw cashews to a mixing bowl and cover with boiling hot water. Let rest for 1 hour (uncovered). Then drain thoroughly.
2. In the meantime, preheat oven to 350 degrees F (176 C) and line a standard loaf pan (or 8x8 inch baking dish // adjust number/size of pan if altering batch size) with parchment paper. Set aside.
3. Add oats, almonds, sea salt, and coconut sugar to a high speed blender and mix on high until a fine meal is achieved.
4. Remove lid and add melted coconut oil, starting with 4 Tbsp (60 g // amount as original recipe is written // adjust if altering batch size) and adding more if it's too dry. Pulse/mix on low until a loose dough is formed, scraping down sides as needed. You should be able to squeeze the mixture between two fingers and form a dough instead of it crumbling. If too dry, add a bit more melted coconut oil.
5. Transfer mixture to parchment-lined loaf pan and spread evenly to distribute. Then place parchment paper on top and use a flat-bottomed object, like a drinking glass, to press down firmly until it’s evenly distributed and well packed. Let it come up the sides a little, otherwise it can be too thick on the bottom.
6. Bake for 15 minutes, then increase heat to 375 F (190 C) and bake for 5-10 minutes more, or until the edges are golden brown and there is some browning on the surface. Remove from oven to cool slightly, then reduce oven heat to 325 degrees F (162 C).
7. Once cashews are soaked and drained, add to a high speed blender with coconut cream, vegan cream cheese, arrowroot starch, vanilla, maple syrup, coconut oil, lemon zest, lemon juice, and sea salt. Blend on high until very creamy and smooth, scraping down sides as needed.
8. Taste and adjust flavor as needed, adding more lemon juice for acidity, lemon zest for tartness, salt for flavor balance, and maple syrup for sweetness.
9. Pour filling over the pre-baked crust and spread into an even layer. Tap on counter to remove air bubbles.
10. Bake for 50 minutes to 1 hour, until the edges look very slightly dry and the center appears only slightly “jiggly” but not liquidy. When you shake it, it will have some give to it, but it shouldn't all look liquid - only the center should jiggle.
11. Let rest for 10 minutes at room temperature, then transfer to refrigerator to let cool completely (uncovered). Once cooled, cover (waiting until cool will prevent condensation) and continue refrigerating for a total of 5-6 hours, preferably overnight.
12. To serve, lift out of pan with parchment paper and cut into bars or triangles. (I carefully cut off the very end pieces because they weren't as creamy as the center pieces.)
13. Enjoy as is or with coconut whipped cream and fresh berries. Store leftovers in the refrigerator, covered, up to 3-4 days, though best within the first 2 days.
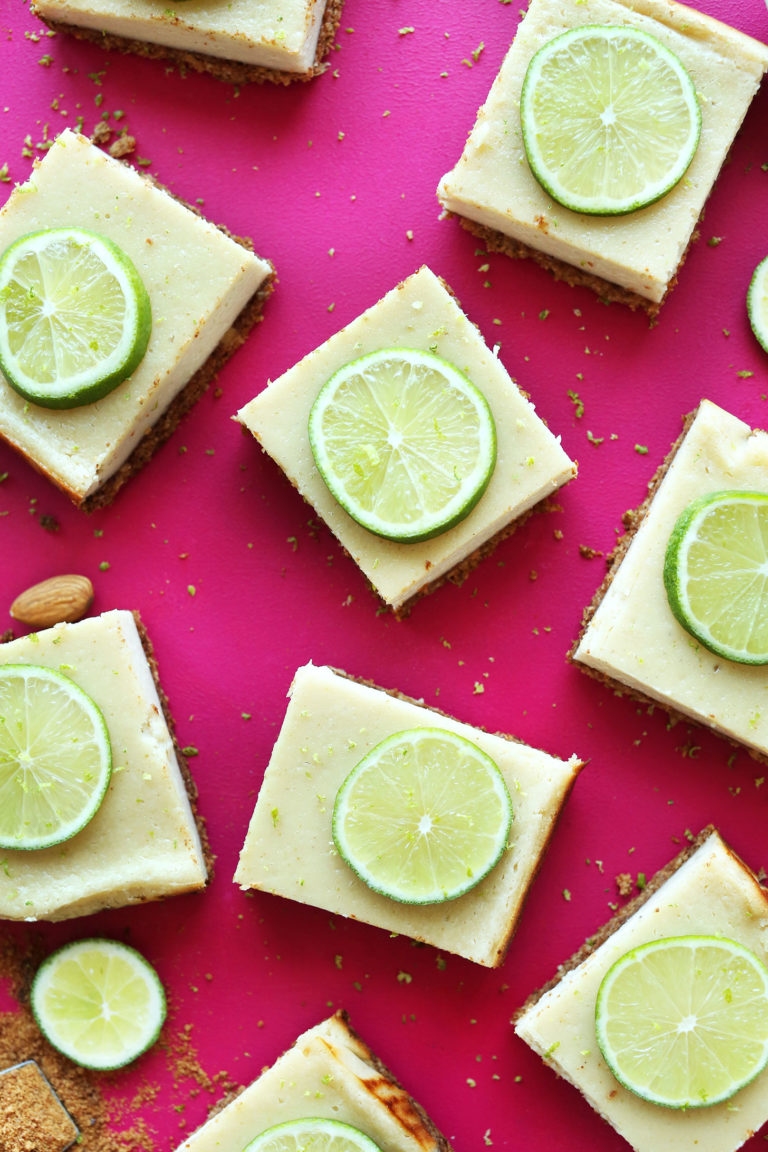
CREAMY LIME PIE BARS
PREP 5 hours 15 minutes; COOK TIME 45 minutes
Ingredients
FILLING
120 g raw cashews
240 g coconut cream (the hardened portion at the top of canned full fat coconut milk or coconut cream)
14 g arrowroot starch (or cornstarch, though I prefer arrowroot in this recipe)
120 ml lime juice (regular or key lime)
4 g lime zest (2 limes yield ~1 heaping Tbsp or 4 g)
1 pinch sea salt
60 ml maple syrup (or agave nectar // plus more to taste)
14 g organic powdered sugar (optional // for topping)
CRUST
80 g gluten-free oats
100 g almonds (I mixed almonds and pecans)
1/4 tsp sea salt
18 g coconut sugar
45-60 ml coconut oil (melted)
Instructions
1. Add raw cashews to a mixing bowl and cover with boiling hot water. Let rest for 1 hour (uncovered). Then drain thoroughly.
2. In the meantime, preheat oven to 350 degrees F (176 C) and line an 8x8 inch baking dish with parchment paper (adjust number/size of pan if altering batch size).
3. Add oats, nuts, sea salt, and coconut sugar to a high-speed blender and mix on high until a fine meal is achieved.
4. Add melted coconut oil, starting with 3 Tbsp (45 ml) and adding more if it's too dry. Pulse/stir with a spoon to combine until a loose dough is formed. You should be able to squeeze the mixture between two fingers and form a dough instead of it crumbling. If too dry, add a bit more melted coconut oil.
5. Transfer mixture to parchment-lined baking sheet and spread evenly. Then place parchment paper on top and use a flat-bottomed object, such as a drinking glass, to press down firmly until it’s evenly distributed and well packed. A little may go up the sides, which is good!
6. Bake for 12 minutes, then increase heat to 375 F (190 C) and bake for 5-8 minutes more or until the edges are golden brown and there is some browning on the surface. Remove from oven to cool slightly. Then reduce oven heat to 350 degrees F (176 C).
7. Once cashews are soaked and drained, add to a high-speed blender with coconut cream, arrowroot starch, lime juice and zest, sea salt, and maple syrup. Mix on high until very creamy and smooth.
8. Taste and adjust flavor as needed. I added a bit more zest and maple syrup. It should be very citrusy, and not overly sweet.
9. Pour filling over the pre-baked crust and spread into an even layer. Tap on counter to remove any air bubbles.
10 Bake for 18-23 minutes or until the edges look very slightly dry and the center appears “giggly” but not liquidy.
11. Let rest for 10 minutes, then transfer to refrigerator to let cool completely (uncovered) - at least 4 hours, preferably overnight.
12. To serve, slice and sift with powdered sugar (optional). Store leftovers in the refrigerator, covered, up to 4 days, though best within the first 2-3 days.
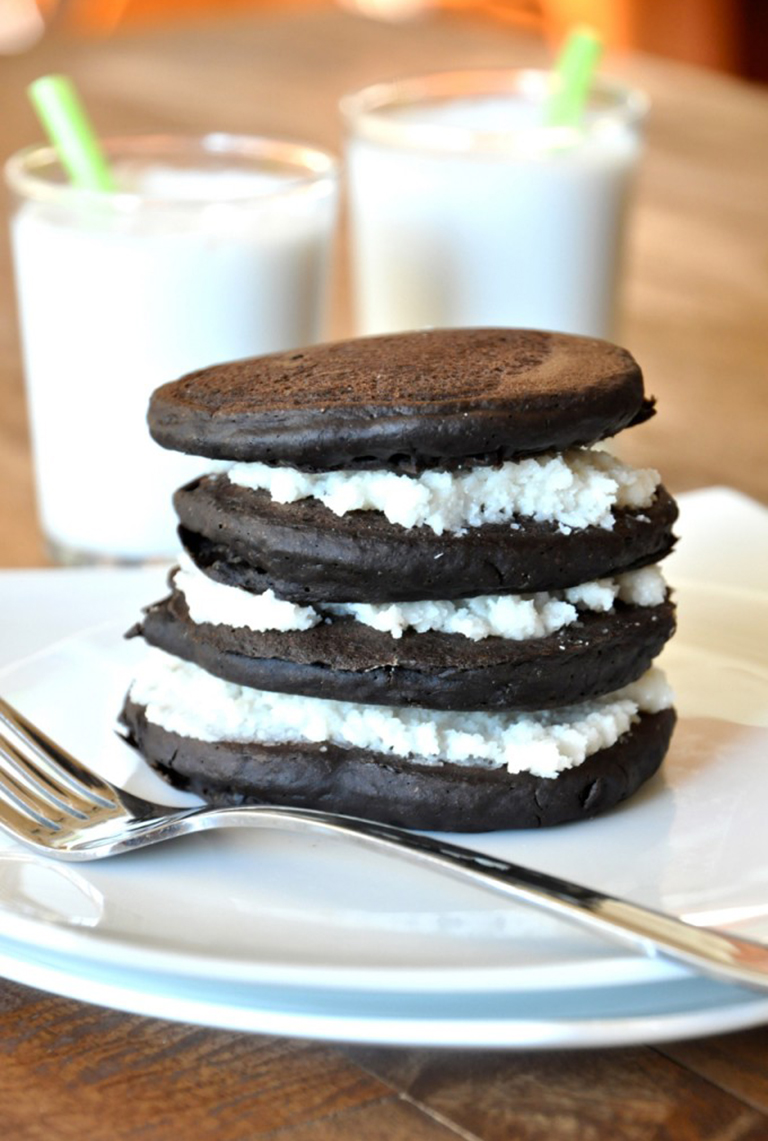
OREO COOKIE PANCAKES
Oreo Cookie Pancakes that are entirely vegan. A fluffy chocolate batter makes a decadent base to a sweet and creamy coconut-vanilla filling. These take breakfast to a whole new level of awesome.
PREP 10 minutes; COOK TIME 5 minutes
Ingredients
PANCAKES
120 ml non-dairy milk (I used SILK coconut)
72 g flour (I used 1/4 whole wheat, 1/4 all-purpose)
1 1/2 tsp baking powder
20 g dark chocolate cocoa powder (or regular)
1 pinch salt
12 g sugar (or other sweetener)
15 ml oil (I used canola)
1/2 tsp vanilla
FROSTING FILLING
90 g unsweetened coconut flake
1/4 tsp vanilla extract
30-45 ml coconut milk (or other non-dairy milk)*
14-21 g powdered sugar (optional)
Instructions
1. FROSTING - Using a food processor, mix the coconut flakes until they form coconut butter. Scrape down the sides as necessary. It may not come to a full paste but it should be near creamy. (Start your pancake batter while it's mixing)
2. Once creamy, add vanilla and powdered sugar and mix again.
3. While the mixture is processing, add in splashes of coconut milk until it resembles a creamy frosting that retains a little thickness.
4. BATTER - Heat a skillet over medium-low heat.
5. Mix milk, oil and vanilla in a small bowl and set aside.
6. Whisk the flour, baking powder, cocoa powder, sugar and salt in a separate bowl until combined.
7. Add the liquid to the dry and mix with a wooden spoon until just combined. Add a touch more milk if it's too thick.
8. Drop small scoops of batter onto the lightly greased skillet. When bubbles start to peak through the surface and you see a bit of light browning/crisping up on the underside, flip the pancakes over carefully, about 2-3 minutes.
9. Repeat on the other side, remove from the pan.
10. Top pancakes with as much frosting as desired. I found a small spoonful between each later was plenty.
More delicious recipes at the minimalistbaker.com 👩🍳🍰